


Now meet Maggie and after you are done, go give her some LOVE AND SUPPORT :)
~~~~~~~~~~~~~~~~~~~~~~~~~~~~~~~~~~~~~~~~~~
I'm Maggie from Chica es Artistica. I'm a teenager who loves sewing, sawing, photography, and all things crafty. I'm so excited to be here today! When Suze posted that she needed guest posters, within about 5 minutes I already had an email sent to her.
This is me:

Today, I'm going to share with you my take on the Shirt Dresses from MADE.
It's definitely not one of those tutorials where you exit out because it's too complicated. I sat and drooled over all the details. I tend to do that a lot. I seriously think every child needs one of these shirt dresses.
Anyway,
I want to tell you that making a pattern is A LOT easier than you think. It's a snap if you have a piece of the child's clothing to go off of, but I didn't. I freehanded one dress and just expanded the pattern for another. And guess what? The dresses miraculously fit! Not me of course...
I just used a roll of paper to make mine. I seriously don't think it was anything fancy...

I found this Women's XL shirt at a garage sale and knew it was perfect for a dress!

It took more than one attempt to make my pattern. I suggest if you're going to make a pattern, draw half of the pattern, cut it out except for the center of it. You can fold it over, trace it, and then cut it all out. SO much easier.

Here's my sleeve. It looks a little odd but the sleeves are supposed to be poofy. Go to MADE to get the pattern. She just gives you a picture with measurements so you'll have to draw your own out.
When tracing your pattern, make sure the bottom of the dress lines up to the hem of the skirt and the center lines up with the buttons.

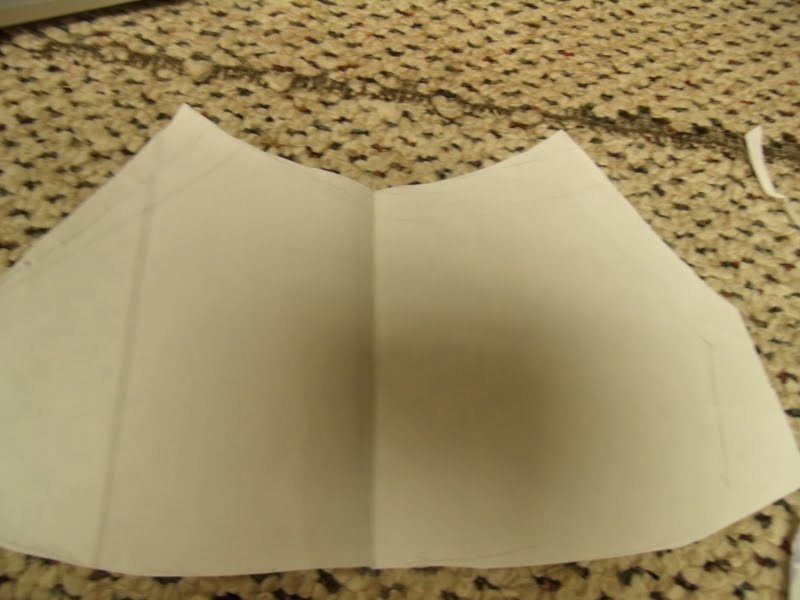
Here's my front and back pieces. Yes they do come up to a point but they're supposed to.


My sleeves had to be traced out of the awkward scraps of armpit/side fabric

All this from one shirt? I only spent a dollar on the shirt! I was so proud of myself for getting all the pieces nicely cut out... that's probably a first.


Seriously VERY easy to assemble. I made a whole second dress without looking at the directions.


And here's my second dress made from an old jean shirt of my dad's. It really needed new life.


The other shirt I used had a few imperfections like so

There was some awkward marks from where I took off the pockets. It adds character right?

I pinned on some rosettes made from the original fabric and I think it was a great touch.

So cute!

And now for the final reveal....


I seriously think I'm going to go raid a thrift store and take all their men's dress shirts so I can make these dresses for random little girls.
Total cost of BOTH dresses? Less than 3 dollars.
Striped Shirt- $1
Jean Shirt- Had
Waist Bands- Left over from another project
Elastic- Less than $2 for 3 yards and I didn't even use it all.
The first dress took me about 3 hours but I was procrastinating on doing something else. The second dress only took me about 1 1/2 hours. It seriously gets easier as you go. I tend to start a project, leave it, and then come back and get another chunk done. I don't have the patience to get it done in one sitting!
Thanks for sitting through all my extensive ramblings! Head on over to Chica es Artistica and check me out.
Thanks for having me Suze!
`````````````````````````````````````````````````````````````````````````````````
Thanks for visiting with us Maggie and good luck with everything that you do:)


1 Lovely Note(s):
None of the pictures are showing for me. Am I broken?
Post a Comment